PhotobucketPhotobucketPhotobucketPhotobucketPhotobucket

Monday, November 22, 2010

Dyeing Wool On the Stove (AKA How to dye wool when you don't have a front loader!)

I promised a long time ago to post a tutorial on how to dye wool over the stove and finally here it is!!

My preferred method for dying wool blend (95% wool, 5% lycra) is in the top-loading washing machine, you get the most even coverage and very rich colors. However, you can't dye 100% wool interlock in the washer because it over-felts and not everyone has a top-loader so here is the tutorial for those who want to dye on the stove top. I happen to be dyeing 100% wool jersey here.

This would also be a great way to dye a wool sweater or something else already knit up.

Following these techniques I have been able to achieve very even dye jobs, I have really fine tuned these steps so I would suggest following them fairly closely:)

First get your materials:

-Large pot, the larger the better, the more room the wool has to move the more evenly the dye job
-acid dyes (I buy Jacquard acid dyes from Dharma Trading)
-vinegar (white from the grocery store)
-small spoon for adding the dye
-large spoon for stirring the wool
-1 cup measuring container for the the vinegar
-synthrapol or dish soap (to remove any excess lanolin, dirt or oils in the wool)
-Candy thermometer (optional but highly recommended)
-rubber gloves to protect your hands

1) Fill the sink or another large container with water and some synthrapol to wash the wool. You don't need a ton but it will depend on how much fabric you are dyeing. I dyed 1 1/2 yards of wool jersey and used 1/8 cup synthrapol. Let the wool soak for at least 1/2 hour. This is to insure that all the dirt, oils, and lanolin are removed so the fibers are extra clean to receive the dye the most evenly (don't skip this step!!).
Note: Wool blend needs to soak the longest, you will be able to see "dry" patches even though the material is immersed. Make sure these are gone before you take the fabric out.

2) Fill your dye pot 3/4 full, the more water the better, the more room for the wool to swirl about during the dyeing and the more even the dye job.


3) Add the dye to the dye pot. I don't measure the dye (although you certainly could and would get even more accurate results if you did.) I eyeball it and go by how dark the water looks. You want to add enough dye for the shade that you want but not so much that the fibers can't absorb it all and get over-saturated. Practice makes perfect and a little goes a long way - I've found. Generally more dye equals darker color. I have found that 100% wool interlock absorbs the most dye (and therefore needs the least to achieve the color you want). Stir the water so that all the dye dissolves.

For this dye job I used 1 1/2 yards of wool jersey with ~3/4 tsp of dye.

You can see how dark the water is where the white spatula is:


4) After the wool is done soaking you can rinse it if there are many many bubbles but if the water is mostly clear don't worry about the extra detergent. (I would rinse for sure if using dish detergent because there are dyes and fragrances in that that will get in the way of the dyeing.) Gently squeeze out as much water as possible and then put the wool into the dye pot. Stir the fabric for at least 1 minute to distribute the dye. The fabric will not take on too much dye at this point.


5) Turn on the heat to high and attach your candy thermometer to the side of the pot. You want to raise the temperature to 200 degrees fahrenheit, this is going to take a while with such a huge pot of water. It is important to start the wool at room temperature and raise the temperature gradually so that it doesn't felt. Don't heat the pot up without the wool in it and then add it later, you will be sorry!

6) Once you have reached 200 degrees (or just before boiling if you don't have a thermometer) it is time to add the vinegar, I added 1 cup of vinegar for this dye job. You want to push the wool away from the location where you will be adding the vinegar or it will leave black spots on the wool. Add the vinegar all at once and then stir for at least 5 minutes. This is when the dye will fix on the fabric, stirring is crucial! You want all sides of the fabric to meet the dye evenly to get an even dye job. You should begin to see the dye water lighten up as the dye goes into the wool and stays there.

Note: Vinegar is in excess in this situation, this means that as long as there is a small amount of vinegar your dye will fix. At the same time you can't really put too much in (with in reason) so don't worry too much about how much you add as long as you add around 1 cup.
 

7) After the water becomes clear stirring is no longer important. Let the pot stay around 200 degrees for 30 minutes and then turn the stove off - don't let it boil: boil = felt.

You can see here, against the white spatula how the water is almost clear:

Note: If the water is not totally clear after 30 minutes you probably added too much dye. Don't sweat it. You can wash out most of the extra dye in the synthrapol rinse at the end. If you are really concerned with the dye running you can always re-cook the wool at 200 degree without adding anything after you rinse out the extra dye.

8) Let the pot and the wool cool down to room temperature by itself. Don't take that wool out and shock it with cold air or you will felt it.

And here the water is totally clear after heating for 30 minutes and letting it cool.


9) Once the wool is cool, take it out and wash it in another synthrapol bath. This removes any extra dye. Rinse and then ring out and let dry. Normally I felt wool at least a little bit so washing it in the washer on warm and drying on medium in the dryer at this point works for me. You have to determine if this will work for you (I would not do this with knit longies for example). If not you can always hang the fabric to dry (not in the sun!).

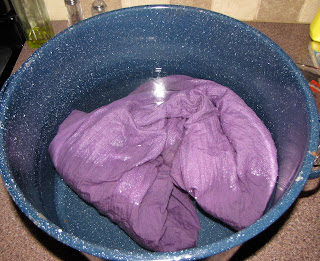
Here it is in the synthrapol bath:


10) Sew up some ADG longies with your lovely dyed wool fabric! :)


Wednesday, November 17, 2010

How to Shorten or Lengethen Longies and Shorties

ADG patterns are geared towards the average babe but who is really average?!?!? Maybe you want to shorten or lengthen the rise or inseam of your pattern to suit your precious one. Here is how you do it. These techniques can be applied to longies or shorties.

1) Print out the pattern in the size you want. You are going to need to print it twice, once for the front and once for the back. You will need to modify both the front and back pattern pieces.


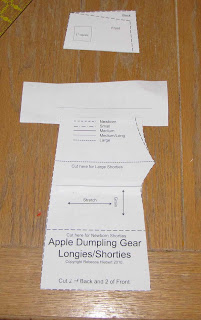
Firstly I am going to make the rise longer on the back pattern piece of the newborn size. The same procedure applies to making the inseam longer.

When measuring for rise take into account the 1/4" seam allowance at the top and bottom of the rise second of the pants.

2) You can't just add more length to the top or bottom of the pants (or shorts) because that will change the shape of the pants - if you don't believe me try it and then compare it to when you do it my way:)

You need to draw a line horizontally across the pattern in a place where the sides of the pants are as close to parallel as possible. You can use the cutting lines as a guide to make sure the line is perfectly horizontal.

3) After drawing the line, cut along that line.


4) Tape a piece of scrap paper to the back of the pattern piece extending beyond the line, and draw another line on the scrap paper showing how much rise you want to add. Draw a new line 1/2" above the old line, in this case I drew my new line 1/2" above because I wanted to add 1/2" to the back rise.


Note!!!!! Please remember that when adding to the rise you are adding it twice: once to the front and once to the back. Therefore by adding a 1/2" to the back I will also add a 1/2" to the front and will add an overall 1" to the rise. (If you don't do this the pattern pieces won't line up.)

5) Tape the top of the pattern piece along the new line, centering as much as possible with the bottom pattern piece.


6) You will probably need to "true" the pattern to make the sides line up properly, you can do an approximation for this, just make sure that the front and back pattern pieces are the same so that when you sew them together they line up.


7) Repeat for the front pattern piece. Place the front on top of the back and make sure they line up where they should. 

Now I will make the inseam shorter. The same applies to making the rise shorter.

Note: When measuring for the inseam take into account the 1" hem allowance at the bottom and the 1/4" seam allowance at the top.

1) Draw a horizontal line across the width of the pattern and cut along this line.


2) To make the rise shorter you want to remove paper from the pattern. I wanted to reduce my inseam by 3/4" so I drew a line 3/4" above the cut line and cut along this line. By removing this small piece I am shortening the longies by 3/4".


Note: When modifying the inseam the amount you take off or add on is the amount that inseam will change by, it will not be doubled as it is with the rise.

3) Tape the two pieces back together centering the bottom and top pieces as best you can. True the edges of the longies.

4) Repeat for the front pattern piece. Place the front on top of the back and make sure they line up where they should.

Go ahead and sew your custom longies or shorties!!

Straight Knitting Needles Holder Tutorial

How horrible is it when you are about to start a project and you can only find one of the the right size needles?!?!?! This will never happen again if you make a knitting needle holder to keep your straights nice and organized.


1) Get the materials you need:
-2 yards of quilter's cotton
-1/2 yard fusible fleece interfacing (not necessary if you are using decorator's weight fabric instead).
-1 yd 1" thick ribbon
-coordinating thread

Note: sew with a 1/4" seam allowance

2) Cut the fabric:
- Lay the two yards on top of each other so you can cut them both at the same time - make sure the edges line up. Cut a rectangle 33 1/2" x 28" for the inside and outside of the holder. Make sure to cut this in the bottom right part of the fabric, right up against the bottom right edge, with the 33 1/2" part running horizontal.
-Cut another rectangle at the top right of the fabric (above the rectangle you just cut) that is 33 1/2" by 10 1/2" for the front of the pocket
-Cut 1 piece of interfacing 33 1/2" by 10 1/2"
-Cut the ribbon 33" long

Note: The holder has an extra long flap at the top to fold over so that your needles to not slide out the top:)

3) Iron the interfacing to the wrong side of one of the front pocket pieces.

4) Place the two pieces for the front of the pocket right sides together and sew the top (only the top) horizontal seam. Turn and press. Top-stitch.


5) Make markings for the different slots that will hold all the different sized needles onto the front of the pocket piece. You can take a look at the needles you have and decide what size slots you want. I made one at 2 1/2" for my really large needles and then few around 2" and 1 1/2" and then quite a few at 1". I made my largest slots at the far left and slowly made smaller and smaller slots going towards the right. You can also sew a horizontal seam across the smallest slots if you want to store double pointed needles in this holder as well so that they poke out of the slots properly.


6) After making the markings lay the pocket piece with the right side up on top of the inner holder piece (leave the outer holder piece to the side), lining up the bottom and side raw raw edges. Pin the pocket piece down and stitch vertically along each of the marking to create the slots. Roll it up as you sew so that it will fit in the machine.

7) Place the outer holder piece and the inner holder piece right sides together. Stitch all around the edges with a 1/4" seam allowance, leaving a gap for turning. Turn, press and top-stitch, thereby closing the gap.


8) Measure up 8 3/4" from the bottom of the holder and make a mark. Place the middle of the ribbon on this mark and sew a square with an "X" in it to secure the ribbon. Cut the raw edges of the ribbon on the diagonal so they won't fray.

9) Organize your needles and put them in their slots! Enjoy your holder:)


Circular Knitting Needle Holder Tutorial

Circular needles can get so tangled and messy! All different lengths and thicknesses in a jumble of wires in the bottom of your knitting basket - no good! Here is a tutorial to help you make a circular knitting needle holder that will keep them all neat as a pin!


1) Collect your materials:
-Fabric scraps at least 13" x 10"
-Fleece iron on interfacing if you are using quilter's cotton (if you are using decorator's weight fabric no need for interfacing.)
-1 yd ribbon
-washable fabric marker
-coordinating thread

2) Cut out your pieces as follows:
-Cut two pieces 13" x 8 1/2" for the outside and inside cover
-Cut two pieces 13" x 8 1/2" of interfacing
-Cut four pieces 11" x 5 3/4" for the outer pocket piece
-Cut four pieces 11" x 7 1/2" for the inner edge of the pockets or the "pages"
-Cut two pieces 11" x 7 1/2" of interfacing
-Cut two pieces of ribbon 10" long

Note: This pattern makes 8 pockets if you wish to make a holder with more you could add another page insert. Add 1" to the width of the cover piece to accommodate the extra page. Make 3 page inserts instead of two.

3) Iron on the larger piece of interfacing the wrong side of the inner cover piece. Iron the smaller pieces of interfacing to the wrong side of the two of the page pieces.

4) Finish the raw edge of the top of each outer pocket piece. Fold over by 1/2" and sew close to the raw edge.


5) Layer the page pieces as follows:
-Lay one page piece face up then lay one outer pocket piece with the wrong side facing the right side of the page piece. Lay the next outer pocket piece with its right side on top of the right side of the previous outer pocket piece. Lay the next page piece with its right side against the wrong side of the last outer pocket piece. Pin and sew all around, making sure to catch all layers. Leave a hole for turning.

6) Clip corners, turn, press and top-stitch.

7) Place the cover pieces wrong sides together and stitch all the way around, leaving a 2-3" gap for turning. Clip corners and turn. Press and top-stitch thereby closing gap. Put to the side.


8) Repeat for the next page.

Note: You may choose to make more than two page inserts in which case you will repeat these steps for each page insert you make.

9) Draw a line down the exact middle of each page insert.
10) Draw a line down the middle of the inner side of the cover and then draw a line 1/2" on either side of the middle line.


Note: If you are making 3 page inserts instead of 2 then you will need to draw a line 1" to the left of the center line and another line 1" to the right of the center line. You will sew a page insert on to each of these three lines.

11) Line up one page insert along the left more line on the inner cover, pin and stitch.

12) Line up the other page insert along the right most line on the inner cover, pin and stitch.

13) Make a mark 1/2" between the top and bottom of the front cover at the two outer edges. Fold one end of each ribbon over by 3/4" and pin each one to the center of each mark. Sew and square with an "X" to secure the ribbon. Cut a diagonal on the other end of each ribbon.

14) Put your circular needles in and you are done! Good work!


LinkWithin